FACEBOOK PROFILE PICTURES FOR BOYS

Awesome profile Pictures For Boys Collection Click here to see

VIEW LOCKED FACEBOOK PROFILE PICTURE

Privacy on Facebook is a big issue Facebook users are concerned about, Facebook even provided the profile display picture locking facility in the past to

USE WHATSAPP WITHOUT ANY MOBILE NUMBER – COOL WHATSAPP TRICK

This whatsapp trick is tweaky, you can use whatsapp without number that means not with your own number.

HOW TO HACK FACEBOOK ACCOUNTS WITH BACKTRACK 5

Step 1 : Open set Tool in Backtrack 5 : To open it follow the step shown above.......

3 BASIC TIPS TO PREVENT A DDOS ATTACK

Distributed denial-of-service (DDoS) attacks are always in top headlines worldwide, as they are plaguing websites in banks, and virtually of almost every organization having a prominent online presence.

Showing posts with label kalilinux. Show all posts

4 Feb 2015

How To Update Kali Linux repositories

  Kali Linux’s Penetration testing system requires constant updating to keep the tools in functional order. This short tutorial will show you the command to update the tools and system.

Step One:

Start Kali Linux and open a terminal.

Step 1


Step Two:


Type apt-get update && apt-get upgrade (without quotes) in the terminal and hit Enter.


Step 2


     Kali will now check it’s webservers for updates. If there are any, it will ask you if you want to install them, hit Enter for yes. 

How To Install Adobe Flash Player In Kali Linux

Kali Linux comes with Iceweasel (Firefox) as an installed browser. For some reason, the producers of Kali Linux missed one thing, the vital Adobe Flash Player plugin. In this  simple tutorial we will show you how to install Adobe Flash Player in Kali Linux’s Iceweasel.

Step One:

Start Kali, login to root, open Iceweasel, and go tohttp://get.adobe.com/flashplayer/.

1

Step Two:

When Adobe.com opens, it should already have detected what version you need (Mine is Linux 64-bit Firefox). So all you need to do is click on the drop down menu that says Select version to download and select .tar.gz for other Linux from the list.


2

Now hit the download button


*Note, Adobe is constantly changing their website, I’ll do my best to keep up with these changes, but your experience may still be a little different than my pictures.
Thank you for understanding!


Step Three:

The download window will now open, and Iceweasel will ask you want you want it to do with the file, select Save file and hit OK.
If Firefox asks you where to save the file too, select the root folder and hit OK.

3

When it has finished downloading, close Iceweasel.

Step Four:

Open a Terminal, type ls and hit Enter. Kali will then display all the folders/files in your root folder, the adobe flash player .tar.gz folder should be among them.


4_thumb[1]

Step Five:

Now that we know the name of the Adobe Flash Player folder, we need to unzip it. Start by copying the name of the Adobe Flash Player folder.


5_thumb[1]

Now type tar –xf and paste the name of the Adobe Flash Player folder. See example below: 

Example: tar –xf install_flash_player_11_linux.x86_64.tar.gz

The name of your Adobe Flash Player folder might be different then mine, so don’t try to copy mine!

The complete command should look similar to this photo:

5.5_thumb[1]

Hit Enter 

Step Six:

Kali should take a couple of seconds to unzip the folder. After it’s complete type this command: mv libflashplayer.so /usr/lib/mozilla/plugins/ and hit Enter.


6_thumb[1]

Kali linux will do the rest, Adobe Flash Player has now been installed! To test your Flash installation, go to this URL in Iceweasel:http://www.adobe.com/software/flash/about/, if you see the little flash animation, then you are good to go! You can also delete all the Flash Player folders/files in your root folder, they’re not important.

Hacking home/school network using Ettercap (MAN IN THE MIDDLE ATTACK)

In this post we will guide you how you can hack a Network and performing MITM attack in Kali Linux.

It’s one of the simplest but also most essential steps to “Conquering” a network. Once a hacker has performed a “Man In The Middle” attack (MITM) on a local network, he is able to perform a number of other “Side-kick” attacks. This includes, cutting a victim’s internet connection; intercepting Emails, logins, and chat messages, Facebook; and many others.


Step One:

Start Kali Linux and login to the root user.

Step Two:

Open a Terminal and type: leafpad /etc/ettercap/etter.conf
Step 1
Step Three:

Look through the text file that just opened. On one of the first lines, under the [privs] section, look for the words highlighted below:

Step 2
You need to change these lines to this:
Step 2.1
By removing the number 65534 and replacing it with 0 (zero). You can leave the “# nobody is default” line.

Step Four:
This next one will be tricky to locate, so we’re going to use the “Find” option. Click onSearch in the toolbar at the top of leafpad and click Find.
Type the word iptables in the box that appears and click the Find button or press Enter.
Step 3
It should skip to a line that looks like this:
Step 3.1
We need to “uncomment” the two bottom lines. To do this, remove the two “#” symbols before each “redir_command,” so that the two lines look like this:
Step 3.2
Now close leafpad and click Yes when it asks you to save changes.

Step Five:
Now start Ettercap-gtk, open a Terminal and type ettercap –G
Step 5
Wait until Ettercap opens. When it does, click Sniff in the toolbar and select Unified Sniffing… from the menu.
Step 5.1
Step Six:
Select the interface that’s connected to the network.
Step 6
If your using a wired (ethernet) connection, then the interface will probably be eth0, but if you’re using wireless, (WLAN), then it will be a different one. To find which one of your interfaces is connected, run ifconfig.
Step Seven:
Now Ettercap should load into attack mode. Click on Hosts and select Scan for hosts from the menu.
Step 7
Step Eight:
Ettercap will briefly scan for hosts on the network. After a moment, you should see the words “hosts added to the host list…” in the command box. This is the green light.
Click on Hosts again, and this time select Hosts list from the menu.
Step 8
Step Nine:
Click the IP address of the router and click the Add to Target 1 button.
Step 9
Then select the IP of your test victim’s machine and click Add to Target 2.
Step 9.1
Step 10:
Now click Mitm on the toolbar and select Arp poisoning
Step 10
When the question box shows up, check the box next to Sniff remote connections and hit OK.
Step 10.1
Step 11:
Ettercap will now Arp poison the victim and router. Now if you want to see any of the victim’s personal info, you’ll need to click Start on the toolbar and select Start sniffing.
Step 11
Ettercap will notify you that unified sniffing was started.
You’ve successfully executed an MITM attack!
You can now use tools such as URLsnarf and SSLstrip to sniff out information about your victim’s internet traffic. Tutorials on how to use these tools will be coming soon.
To stop the MITM attack, click on MITM and select Stop mitm attack(s) from the menu.
Step stop
Ettercap will then send the ARP correction packet, and the network will return to normal. You can then close Ettercap.

hack wifi password using kali linux

Kali Linux is a security-focused operating system you can run off a CD or USB drive, anywhere. With its security toolkit you can crack Wi-Fi passwords, create fake networks, and test other vulnerabilities.
A lot of readers send many request regarding how to crack wireless WPA2 password.


Kali Linux is packed with a ton of software for testing security holes in your network. There are far too many to list here, but we're so enamored with it that we decided to pick a few of our favorite tools and show how they work: Aircrack, Airbase, and ARPspoof. We'll show you how to crack a Wi-Fi password with brute force techniques, create a fake router to trick machines into logging into it, and perform a man in the middle attack to eavesdrop on network communications.


Crack a WPA Wi-Fi Password with Aircrack

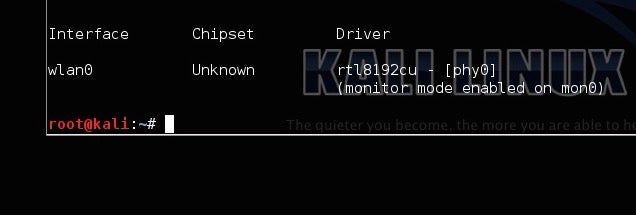
Disconnect from all wireless networks. Then open up terminal. In order to use Aircrack, you'll need a wireless card that supports injections. Type this (airmon-ng) into the Terminal to make sure your card supports it
hack wifi password using kali linux


airmon-ng start wlan0
Replace wlan0 with your card's interface address. You should get a message back saying that monitor mode was enabled.

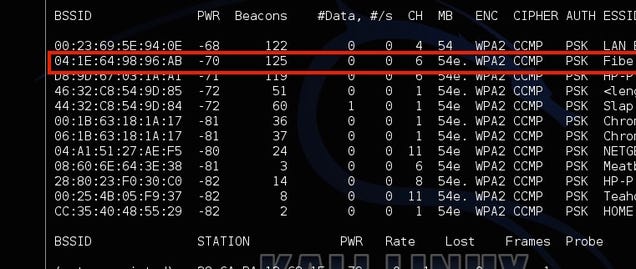
next type airodump-ng  mon0
You'll see all the networks in your area. Locate your network from the list, and copy the BSSID, while making a note of the channel it's on. Tap Ctrl+C to stop the process.
Next, type this in, replacing the information in parentheses with the information you gathered above

airodump-ng -c (channel) --bssid (bssid) -w /root/Desktop/ (monitor interface)


Now, you'll be monitoring your network. You should see four files pop up on the desktop. Don't worry about those now; you'll need one of them later. The next step is a bit of a waiting game, as you'll be sitting around waiting for a device to connect to a network. In this case, just open up a device you own and connect to your Wi-Fi. You should see it pop up as a new station. Make a note of the station number, because you'll need that in the next step

Now, you're going to force a reconnect so you can capture the handshake between the computer and the router. Leave Airodump running and open up a new tab in Terminal. Then type in

aireplay-ng -0 2 -a (router bssid) -c (client station number) mon0

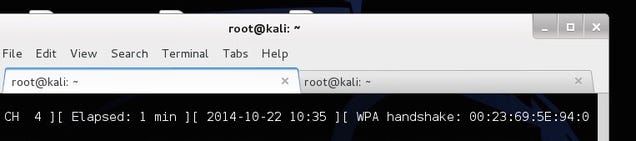
You'll now see Aireplay send packets to your computer to force a reconnect. Hop back over to the Airodump tab and you'll see a new number listed after WPA Handshake. If that's there, you've successfully grabbed the handshake and you can start cracking the password.


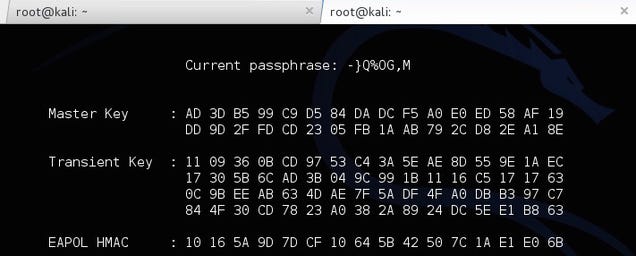
You now have the router's password in encrypted form, but you still need to actually figure out what it is. To do this, you'll use a password list to try and brute force your way into the network. You can find these lists online, but Kali Linux includes a few small lists to get you started in the /usr/share/wordlists directory, so we'll just use one of those. To start cracking the password type this in
aircrack-ng -a2 -b (router bssid) -w (path to wordlist) /Root/Desktop/*.cap


Now, Aircrack will try all of those passwords to see if one fits. If it does, you'll get a message saying the key was found with the password. If not, give another one of the password lists a try until you find one that works. The bigger the password list, the longer this process will take, but the greater chance you have of succeeding


31 Jan 2015

hack wifi wpa/wpa2 with kali linux


Reaver implements a brute force attack against Wifi Protected Setup (WPS) registrar PINs in order to recover WPA/WPA2 passphrases, as described in http://adf.ly/Q210f


Reaver has been designed to be a robust and practical attack against WPS, and has been tested against a wide variety of access points and WPS implementations.


On average Reaver will recover the target AP's plain text WPA/WPA2 passphrase in 4-10 hours, depending on the AP. In practice, it will generally take half this time to guess the correct WPS pin and recover the passphrase

29 Jan 2015

hack a pc using kali linux

hacking a pc using kali linux:


25 Jan 2015

hack facebook account using ettercap

Perform  Man In The Middle(MITM) Attack With Kali Linux & Ettercap


In this post we tell you about using MITM attack and Ettercap in kali Linux. This attack is valid only if you are connected to a same local network like home School Universities , Airports.


Once a hacker has performed a “Man In The Middle” attack (MITM) on a local network, he is able to perform a number of other “Side-kick” attacks. This includes, cutting a victim’s internet connection; intercepting Emails, logins, and chat messages; and many others.

 tools require for this attack:
  • An install or Live boot of Kali Linux, a well-known OS containing a collection of hundreds of penetration testing tools.
If you have that, then proceed to the tutorial below, and we’ll demonstrate how to perform this powerful attack.

Important Notice: This tutorial is intended to be used for penetration testing, i.e. the act of hacking to become more secure. It is not at all meant for malicious purposes. Performing any type of fraudulent activity on someone else’s network without permission is considered a crime in most countries.


Step One:
Start Kali Linux and login to the root user.


Step Two:
Open a Terminal and type: leafpad /etc/ettercap/etter.conf

Step 1


Step Three:
Look through the text file that just opened. On one of the first lines, under the [privs] section, look for the words highlighted below:

Step 2


You need to change these lines to this:
Step 2.1

By removing the number 65534 and replacing it with 0 (zero). You can leave the “# nobody is default” line.

Step Four:
This next one will be tricky to locate, so we’re going to use the “Find” option. Click onSearch in the toolbar at the top of leafpad and click Find.
Type the word iptables in the box that appears and click the Find button or press Enter.

Step 3

It should skip to a line that looks like this:

Step 3.1

We need to “uncomment” the two bottom lines. To do this, remove the two “#” symbols before each “redir_command,” so that the two lines look like this:

Step 3.2

Now close leafpad and click Yes when it asks you to save changes.

Step Five:
Now start Ettercap-gtk, open a Terminal and type ettercap –G

Step 5

Wait until Ettercap opens. When it does, click Sniff in the toolbar and select Unified Sniffing… from the menu.

Step 5.1

Step Six:
Select the interface that’s connected to the network.

Step 6

If your using a wired (ethernet) connection, then the interface will probably be eth0, but if you’re using wireless, (WLAN), then it will be a different one. To find which one of your interfaces is connected, run ifconfig.

Step Seven:
Now Ettercap should load into attack mode. Click on Hosts and select Scan for hostsfrom the menu.

Step 7
Step Eight:

Ettercap will briefly scan for hosts on the network. After a moment, you should see the words “hosts added to the host list…” in the command box. This is the green light.
Click on Hosts again, and this time select Hosts list from the menu.
Step 8

Step Nine:
Click the IP address of the router and click the Add to Target 1 button.
Step 9

Then select the IP of your test victim’s machine and click Add to Target 2.

Step 9.1

Step 10:
Now click Mitm on the toolbar and select Arp poisoning…
Step 10

When the question box shows up, check the box next to Sniff remote connections and hit OK.

Step 10.1

Step 11:
Ettercap will now Arp poison the victim and router. Now if you want to see any of the victim’s personal info, you’ll need to click Start on the toolbar and select Start sniffing.

Step 11

Ettercap will notify you that unified sniffing was started.

You’ve successfully executed an MITM attack!
You can now use tools such as URLsnarf and SSLstrip to sniff out information about your victim’s internet traffic. Tutorials on how to use these tools will be coming soon.
To stop the MITM attack, click on MITM and select Stop mitm attack(s) from the menu.

Step stop

Ettercap will then send the ARP correction packet, and the network will return to normal. You can then close Ettercap.

enjoy and share virus volt :)